What is in for you
In today’s tutorial (which is actually already number four) we will have a deeper look at how the UI is being updated when a change to the program data occurs. So UI and internal
If you have followed the previous tutorials, you might have wondered where the UI is being updated. We made some changes to the internal data structures (like performing a copy & paste operation) but we never really cared about the visual appearance. Obviously, WinUI provides some “magic” which does this kind of updates in the background.
Like in the previous tutorials, we will once more use the handling of an RNA molecule with its nucleotides (if this is the first How 2 you are reading, then check the introduction of the first tutorial “How to make a Data Template Selector/Part I” about the background of the biochemistry we simulate). Today, I won’t add too much code. I will rather mainly stick to the code of tutorial number three and have a deeper look at how the UI update works internally.
But since a tutorial without any (new) code might be a bit boring, we will add a small feature to our “RNA designer” and add a control which will tell us the number of nucleotides in the RNA. That control is a perfect example of how UI updating happens in the background.
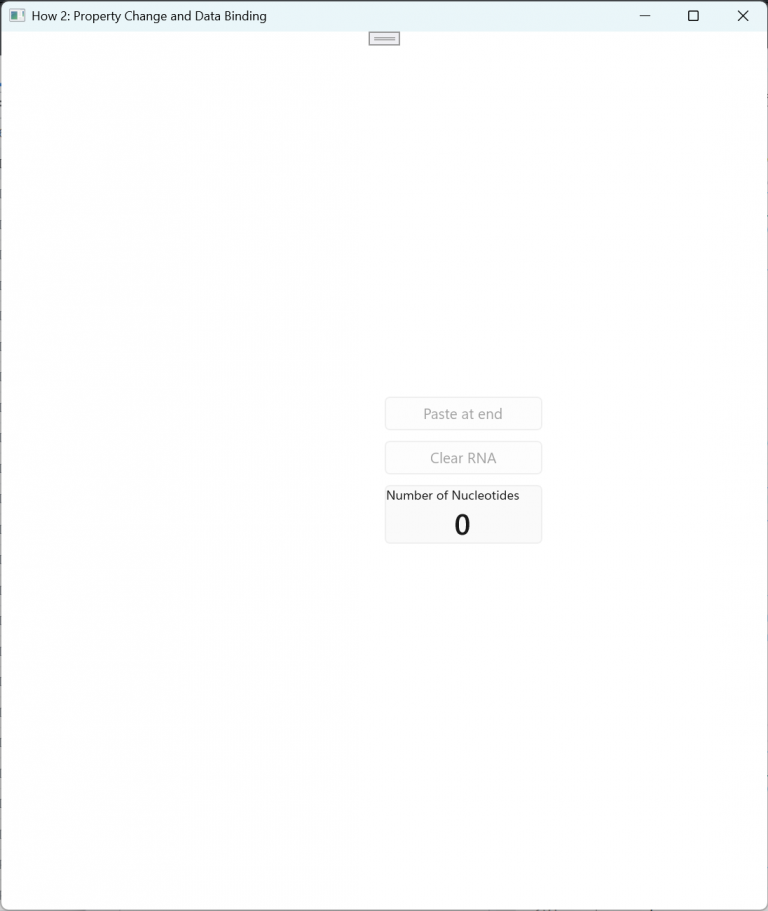
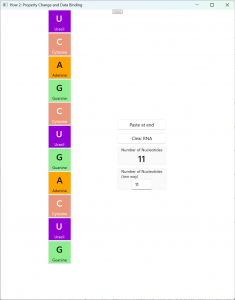
The user experience is fairly simple. We will just have an additional control showing the number of nucleotides in the RNA. The control will be updated by the app when a change to the RNA occurs.
If we copy a nucleotide sequence e.g. from the windows notepad to the clipboard…
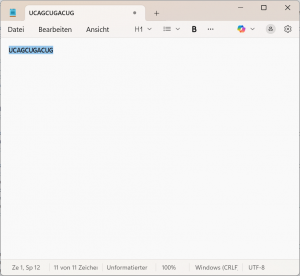
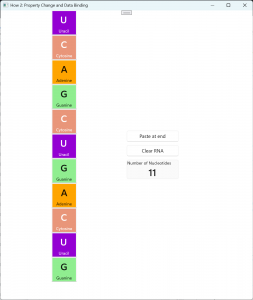
… we can paste it using the “Paste at end” button and we will see the RNA as well as the number of nucleotides:
In this tutorial you will learn about:
- The principles of data binding
- How and when to use mono-directional and bi-directional data binding
- How to use property change notifications.
You will find the code in my GitHub repositories: https://github.com/AgentSmith-Dev/How2-WinUI
What you should already know
- It might be a good idea if you already have read the “How 2 number three: Copy & Paste”.
The User Experience
We need an additional control in the main window which is MainWindow.xaml. Our control is composed of two <TextBlock> elements. One showing the title, the other one showing the number of nucleotides. For a background color and a border we wrap everything up in a <Grid> structure:
<Grid   Margin="0, 10, 0, 0"    Width="150"
        BorderBrush="{StaticResource  CardStrokeColorDefaultBrush}"
        Background="{StaticResource CardBackgroundFillColorSecondaryBrush}"
        BorderThickness="1"
        CornerRadius="{StaticResource   ControlCornerRadius}"
        HorizontalAlignment="Left">
    <Grid.RowDefinitions>
        <RowDefinition Height="Auto"/>
        <RowDefinition Height="Auto"/>
    </Grid.RowDefinitions>
    <TextBlock    Grid.Row="0"
                  Text="Number of Nucleotides"
                  Style="{StaticResource  CaptionTextBlockStyle}"
                  HorizontalAlignment="Center"
                  />
    <TextBlock    Grid.Row="1"
                  Text="{x:Bind   hstrGetRNANbNucleotides, Mode=OneWay}"
                  Style="{StaticResource  TitleTextBlockStyle}"
                  HorizontalAlignment="Center"
                  />
</Grid>There is nothing special about the xaml statements so far. It is just one attribute where all the “magic” starts which tells WinUI which text to be displayed:
Text="{x:Bind hstrGetRNANbNucleotides, Mode=OneWay}"The code behind function hstrGetRNAnbNucleotides() is being called which obviously will return the number of the nucleotides (let’s skip the “Mode” parameter for a couple of minutes).
In the IDL we declare the function for the COM-like environment:
namespace How2_PropertyChange_DataBinding
{
    [default_interface]
    runtimeclass MainWindow : Microsoft.UI.Xaml.Window, Microsoft.UI.Xaml.Data.INotifyPropertyChanged
    {
                    MainWindow();

        clWinUIRNA  GetWinUIRNA_Window_Property{get;};
            Boolean bHasRNAClipboardData;
            Boolean bHasRNAData{get;};
            String  hstrGetRNANbNucleotides{get;};
    }
}The implementation uses our vector with the nucleotides, asks for its size and converts it to a string:
//  ------------------------------------------------------------------------------------------------------
/*! \brief  property (to be used by XAML): number of nucleotides in the RNA object
*
*   \date   09/24/2025  AGS Start
*/
//  ------------------------------------------------------------------------------------------------------
hstring MainWindow::hstrGetRNANbNucleotides()
{
		return  to_hstring(this->m_WinUIRNA.Get_obsvecRNA_Property().Size());
}
Architecture
In the previous tutorials we already talked about the overall architecture of the application. As you see, our main window has access to the RNA data:
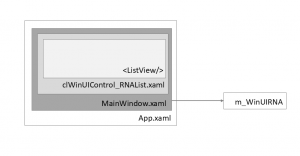
Architecture of the WinUI3 HowTo „DataTemplateSelector – Part I“
From a MVVM (model view-view model) or MVC (model view control) perspective MainWindow.xaml represents the view and m_WinUIRNA the model.
Data Binding
The mechanism to connect the view and the model with each other is called “Data Binding”:
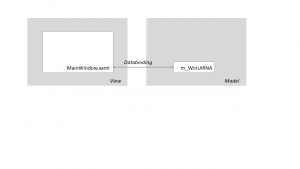
That’s exactly what happens in the XAML directive above, the function hstrGetRNAnbNucleotides() allows the view to connect to the model.
Direction of the data flow with Data Binding
The previously mentioned “Mode” parameter is set to “OneWay” which means that the view is being updated by the data from the model. If we change the data in the view and keep Mode=OneWay the data in the model will not be updated. Of course not, there is no connector in the model available. If we want a two-way connection, we had to set Mode=TwoWay and we had to implement an additional “connector” on the model side. We will look at this later on.
Property change notifications
Now we have a connection between the view and the model in place. What we still need is a mechanism to inform the view (our main window, more precise our control in the main window) about a change in the model.
In WinUI this is being done by events (we already used events in tutorial number three for our copy & paste operation. There, we wanted to get informed by third party applications about a change in the clipboard). Each event which an application uses is specific for a certain type of “delegate” (a delegate is a function which is being called when the event is being raised). For the property changed notification the delegate is of type IPropertyChangedNotification. What we therefore need is an event which can be used for the communication between view and model. The event template is PropertyChangedEventHandler. Since the model needs to inform the view, the event is part of the MainWindow class:
private:

  event_token m_EventToken_ClipboardChanged;  //!<    event token for clipboard changed event
  winrt::event<Microsoft::UI::Xaml::Data::PropertyChangedEventHandler>	m_MainFrame_PropertyChanged;    //!<    event token for property changed notifications


  winrt::How2_PropertyChange_DataBinding::clWinUIRNA  m_WinUIRNA;
bool m_bHasRNAClipboardData = false;Furthermore, we need to add the INotifyPropertyChanged interface to the class which provides the event. That is done by inheritance in the IDL:
namespace How2_PropertyChange_DataBinding
{
    [default_interface]
    runtimeclass MainWindow : Microsoft.UI.Xaml.Window, Microsoft.UI.Xaml.Data.INotifyPropertyChanged
    {
                    MainWindow();

        clWinUIRNA  GetWinUIRNA_Window_Property{get;};
            Boolean bHasRNAClipboardData;
            Boolean bHasRNAData{get;};
            String  hstrGetRNANbNucleotides{get;};
            String  strRNANbNucleotides_Property;

    }
}
The INotifyPropertyChanged interface requires the possibility of adding and removing delegates. Therefore, you would get an error message when you would compile the IDL by now. It would complain about two missing functions: PropertyChanged(). We need to add these as well:
struct MainWindow : MainWindowT<MainWindow>
{
MainWindow();
~MainWindow();
winrt::How2_PropertyChange_DataBinding::clWinUIRNA GetWinUIRNA_Window_Property();
bool bHasRNAClipboardData();
void bHasRNAClipboardData(bool value);
bool bHasRNAData();
hstring hstrGetRNANbNucleotides();
winrt::event_token PropertyChanged(winrt::Microsoft::UI::Xaml::Data::PropertyChangedEventHandler const& handler);
void PropertyChanged(winrt::event_token const& token) noexcept; // ------------------------------------------------------------------------------------------------------
/*! \brief init/deinit handler for property changed events
* \date 09/15/2025 AGS Start
*/
// ------------------------------------------------------------------------------------------------------
winrt::event_token MainWindow::PropertyChanged(winrt::Microsoft::UI::Xaml::Data::PropertyChangedEventHandler const& handler)
{
return m_MainFrame_PropertyChanged.add(handler);
}
void MainWindow::PropertyChanged(winrt::event_token const& token) noexcept
{
m_MainFrame_PropertyChanged.remove(token);
return;
}The first version of PropertyChanged() ATTACHES an event handler which returns a unique event token (If you look into WinUIs implementation in base.h you will find that the event token is something like an iterator for an internal vector which points to the position where all the different event handler are stored). The second version DETACHES an event handler, which is then identified by exactly that event token.
You do not need to call PropertyChanged() yourself, unless you want to add your own separate event handler. WinUI calls the PropertyChanged() function when MainWindow is being instantiated and connects it with its build-in WinUI event handler. You can check this out by placing breakpoints in the functions when you launch the application.
Now we have everything in place, let’s summarize it up:
A connector through which MainWindow (the view) can get the RNA data (the model) from. This connector is our hstrGetRNANbNucleotides() function.
- A mechanism where the model can inform the view about a change in the data. This is done through our event m_MainFrame_PropertyChanged which is connected with the WinUI framework through an internal event handler which is being attached by a call of PropertyChanged() by the framework.
What still needs to be done
What still needs to be done is to raise an event when the internal data has been changed. That is fairly easy: each time a change to the internal data (=the model) occurs we need to raise an event. That will result in a call of a connector of the model.
For example, if the user performs a paste operation and we convert the text string in the clipboard into nucleotide objects, we need
a) update our internal state which tells the application that there are RNA data available (which is for the enable state of our “Clear” button) and
b) update the number of nucleotides:
// ------------------------------------------------------------------------------------------------------
/*! \brief paste clipboard content to the end of the RNA
* \date 09/15/2025 AGS Start
*/
// ------------------------------------------------------------------------------------------------------
winrt::Windows::Foundation::IAsyncAction MainWindow::PasteClipboardToRNA()
{
winrt::Windows::ApplicationModel::DataTransfer::DataPackageView dataPackageView = nullptr;
dataPackageView = winrt::Windows::ApplicationModel::DataTransfer::Clipboard::GetContent();
winrt::hstring hstrClipBoard = co_await dataPackageView.GetTextAsync();
int iPos=0;
while (iPos < (int)hstrClipBoard.size()) {
wchar_t c = hstrClipBoard[iPos];
m_WinUIRNA.CreateAndAddNucleotide(c);
iPos++;
} // endwhile (iPos < hstrClipBoard.size()) {
// notify interested parties
m_MainFrame_PropertyChanged(*this, Microsoft::UI::Xaml::Data::PropertyChangedEventArgs{ L"bHasRNAData" });
m_MainFrame_PropertyChanged(*this, Microsoft::UI::Xaml::Data::PropertyChangedEventArgs{ L"hstrGetRNANbNucleotides" });
co_return;
}If you simply want to update all controls, just call PropertyChangedEventArgs() with an empty string:
m_MainFrame_PropertyChanged(*this, Microsoft::UI::Xaml::Data::PropertyChangedEventArgs{ L"" });
A quick deeper look
Our event in m_MainFrame_PropertyChanged is of type winrt::event<Microsoft::UI::Xaml::Data::PropertyChangedEventHandler>. If you look once more into base.h you will find that the () operator is being overloaded. Its parameters are a list of arguments. In our code the first argument being passed is “us” (which is the ‘this‘ object) the second is a newly created instance of the Microsoft::UI::Xaml::Data::PropertyChangedEventArgs class which gets a string as a parameter. The WinUI documentation states this string is “the short name of the property that changed”, which is usually a getter function.
Obviously, all we need to do, if a change of data in the ‘model’ occurs is to call the ‘connector’ which supplies the (changed) data.
Observable collections
Remember our first tutorial where we set up the application? We chose an “observable vector” to store the nucleotides of the RNA. The class we chose is winrt::Windows::Foundation::Collections::IObservableVector<T> . The IObservableVector class encapsulates the mechanisms for property changed notifications. It implements its own event internally. If a change to the vector occurs that event will automatically be raised and the view(s) which use the vector will be informed. If you want to go more into detail about the internals, the generated code in clWinUIControl_RNAList.xaml.g.hpp might be a good start.
The take-away from this: if you implement a vector by using the IObservableVector<T> class you do not need to worry about the implementation of property change mechanisms by yourself. The WinUI framework does it for you.
However, if you want to get informed about a change to your vector for a reason, you may add your own delegate by calling the IObservableVector<T> member function VectorChanged().
Once more: Mode=TwoWay
In our example we provided data binding in only one direction: when the internal data are updated the view of the data are updated as well. In data binding we added the connector with the Mode=OneWay.
Let’s look at a short “two-way” example. We add another control which not only shows the number of nucleotides in the RNA but where we also can enter the number of nucleotides. If we enter a number lower than the number of nucleotides in the RNA we will shorten the RNA, if we enter a higher number we will add invalid nucleotides at the end.
Let’s update the user interface first and add that additional control:
<!-- Two way data binding -->
<Grid Margin="0, 10, 0, 0" Width="150"
BorderBrush="{StaticResource CardStrokeColorDefaultBrush}"
Background="{StaticResource CardBackgroundFillColorSecondaryBrush}"
BorderThickness="1"
CornerRadius="{StaticResource ControlCornerRadius}"
HorizontalAlignment="Left">
<Grid.RowDefinitions>
<RowDefinition Height="Auto"/>
<RowDefinition Height="Auto"/>
</Grid.RowDefinitions>
<TextBlock Grid.Row="0"
Text="Number of Nucleotides (two way)"
Style="{StaticResource CaptionTextBlockStyle}"
HorizontalAlignment="Center"
/>
<TextBox Grid.Row="1"
Text="{x:Bind strRNANbNucleotides_Property, Mode=TwoWay}"
HorizontalAlignment="Center"
/>
</Grid>
Note the “Mode=TwoWay” parameter in the <TextBox>.
In the IDL we define a separate ‘connector’ which now also has to work both ways. We need to be able to read AND write data from AND to our ‘model’:
namespace How2_PropertyChange_DataBinding
{
    [default_interface]
    runtimeclass MainWindow : Microsoft.UI.Xaml.Window, Microsoft.UI.Xaml.Data.INotifyPropertyChanged
    {
                    MainWindow();

        clWinUIRNA  GetWinUIRNA_Window_Property{get;};
            Boolean bHasRNAClipboardData;
            Boolean bHasRNAData{get;};
            String  hstrGetRNANbNucleotides{get;};
            String  strRNANbNucleotides_Property;

    }
}Of course, we could now replace the hstrGetRNANbNucleotides() function which does the same as the getter implementation of strRNANbNucleotides_Property(). For readability of the tutorial, we will keep it that way.
We need to raise events for that control in PasteClipboardToRNA() as well as in OnBtnClearRNA_Click():
//  notify interested parties
m_MainFrame_PropertyChanged(*this, Microsoft::UI::Xaml::Data::PropertyChangedEventArgs{ L"bHasRNAData" });
m_MainFrame_PropertyChanged(*this, Microsoft::UI::Xaml::Data::PropertyChangedEventArgs{ L"hstrGetRNANbNucleotides" });
m_MainFrame_PropertyChanged(*this, Microsoft::UI::Xaml::Data::PropertyChangedEventArgs{ L"strRNANbNucleotides_Property" });Finally, the implementation of the getter/setter:
//  ------------------------------------------------------------------------------------------------------
/*! \brief  property (to be used by XAML): number of nucleotides in the RNA object
*
*           Used for two-way binding
*   \date   09/24/2025  AGS Start
*/
//  ------------------------------------------------------------------------------------------------------
hstring MainWindow::strRNANbNucleotides_Property()
{
    return  to_hstring(this->m_WinUIRNA.Get_obsvecRNA_Property().Size());
}
void MainWindow::strRNANbNucleotides_Property(hstring const& value)
{
    int iSize;

		iSize = _wtoi(value.c_str());

    while ((int)this->m_WinUIRNA.Get_obsvecRNA_Property().Size() < iSize) {
			this->m_WinUIRNA.CreateAndAddNucleotide('?');
    }   //  endwhile (this->m_WinUIRNA.Get_obsvecRNA_Property().Size() < iSize) {

    while ((int)this->m_WinUIRNA.Get_obsvecRNA_Property().Size() > iSize) {
			this->m_WinUIRNA.Get_obsvecRNA_Property().RemoveAtEnd();
		}   //  endwhile (this->m_WinUIRNA.Get_obsvecRNA_Property().Size() > iSize) {


    return;
}Each time we change the value in the <TextBox>, the setter of strRNANbNucleotides_Property() is being called. Remember: since we use an observable vector, there is no need to manually raise an event after we have modified the vector – WinUI does it for us.
What you should know about Mode=OneTime
We talked about the two modes Mode=OneWay and Mode=TwoWay. There is a third mode: Mode=OneTime. This is kind of a ‘static data binding’. If you set Mode=OneTime your getter function will only be called once. That call happens exactly by the time your control is being created. Please keep in mind: your ‘connector’ will NOT BE CALLED ANYMORE. No matter if and when you raise events! And that is a common pitfall: if you forget to set the Mode parameter, WinUI will set it to its default value which is Mode=OneTime.
And I can assure you: hours of developer time (including my own) have been wasted with controls that do not update themselves, because the Mode parameter had not set.
Why is Mode=OneTime available, anyway? Microsoft brings up performance issues. Which is very likely right. The OneTime option simply does not implement any property change notification which of course safes time. However, in my experience, most of the time you do NOT have ‘static’ data binding BUT dynamic data binding, means the internal data change and UI has to reflect to that.
And, by the way, we are already done!
Summary
Let’s summarize the major thoughts:
- Property changed notifications are being used to synchronize the ‘view’ (the UI in your application) with the ‘model’ (the data of your application).
- The mechanism for the communication between those two is called ‘data binding’.
- This mechanism uses WinUI events.
- To implement data binding between a control and its internal data representation the view needs to implement an event which templates the PropertyChangedEventHandler class.
- To enable property change notification, your view (where you implement the event) needs to implement the interface Microsoft.UI.Xaml.Data.INotifyPropertyChanged. That is being done in the IDL. This also requires the implementation of two PropertyChanged() functions.
- When an internal date has changed you need to raise the data binding event with the name of the property attached to.
- The Mode property defines the direction of the data binding. Caution: if you do not specify the Mode property it will be set to its default which is Mode=OneTime, which is kind of a static property
- The “observable collections” (IObservableVector, IObservableMap, …) have all these mechanisms ‘build in’.