Part II
What is in for you?
In Part I of this “How To” we learned how easy it is to create a list using the ListView control of WinUI. But the promising headline was “how to use a Data Template selector” and honestly, yes, we used a data template, but we did not use a SELECTOR at all. So, finally we learned how to set up a list rather quickly and we saw how easy it is to style the items using XAML. But I promised that it is also easy to style each item INDIVIDUALLY. And that is exactly where a data template SELECTOR comes into play.
In this tutorial you will learn about:
- Reusing a <DataTemplate> within a <ContentControl>
- Using static resources as defined in the WinUI3 gallery
- Using a data template selector
What we will reach within this How To:
You should have read Part I of this how to, since we will extend that code we will mainly rely on the concepts there.
You will find the code in my GitHub repositories: https://github.com/AgentSmith-Dev/How2-WinUI
Further reading: https://learn.microsoft.com/en-us/windows/apps/design/controls/data-template-selector
The principle
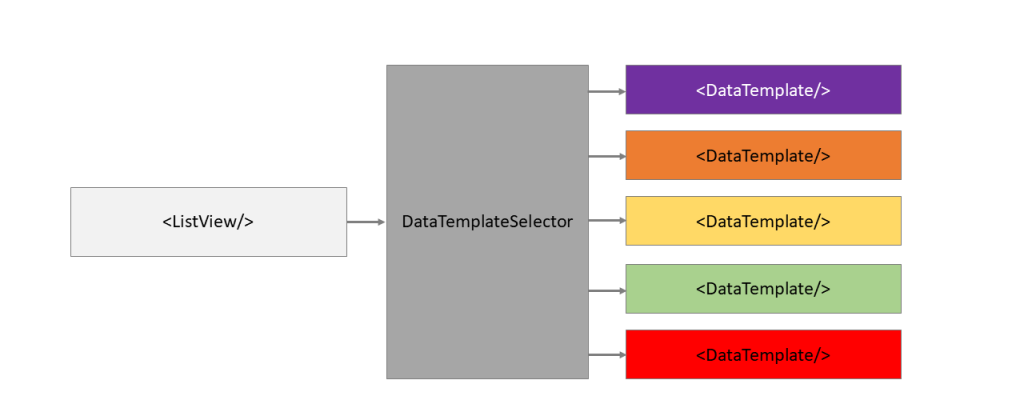
When we used the <ListView> attribute ItemTemplate in Part I we established a 1:1 relationship between an item in the control and the <DataTemplate> to be used for rendering.

If we have more than one template available, we additionally need something in between. That is where the data template selector comes into play:
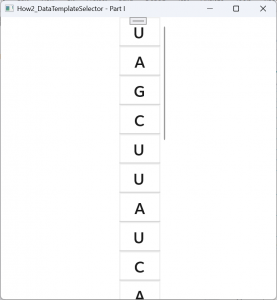
The look of the nucleotides
Let’s start, where good concepts usually start: with the customer experience. Let’s design the look (&feel) of the nucleotides first. Currently we focus on the part “look” – there is not so much “feel” (yet!) in – we will improve that in one of the later “How Tos”. But even though we want to have a different look for each nucleotide we do not want to have them entirely different. Therefore, we keep the main look of a nucleotide from the first part. Each nucleotide is represented by a large capital letter:
<!--    ++++++++++++++++++++++++++++++++++++++++++++++++++++++++++++++++++++    -->
<!--    A Nucleotide -->
<!--    ++++++++++++++++++++++++++++++++++++++++++++++++++++++++++++++++++++    -->
  <DataTemplate x:Key="resNucleotide" x:DataType="local:clWinUINucleotide">
      <StackPanel>
          <TextBlock Text="{x:Bind hstrSymbol_Property, Mode=OneWay}"
                     Margin="5"
                     Style="{StaticResource   TitleTextBlockStyle}"
          />
      </StackPanel>
</DataTemplate>Have you noticed (already in Part I): there is no reason for the use of the <StackPanel> control. However, I usually start with a wrapping <StackPanel> control even though there might be only one control inside of it. But usually, an additional control will be added in the development process sooner or later and therefore I use to have it from the beginning. But if you were wondering about the purpose of the <StackPanel> in the design of the nucleotide in Part I, here is the answer: there is no reason.
In Part I each nucleotide had a border around its capital letter. You probably have noticed that this has been gone. Well, it’s time to start individualization and each nucleotide type will get its individual border with its individual border color. Let’s start with Adenine and we define an additional <DataTemplate> just for “Adenine”:
<!--    ++++++++++++++++++++++++++++++++++++++++++++++++++++++++++++++++++++    -->
<!--    The Adenine nucleotide -->
<!--    ++++++++++++++++++++++++++++++++++++++++++++++++++++++++++++++++++++    -->
<DataTemplate x:Key="resNucleotide_Adenine" x:DataType="local:clWinUINucleotide">
    <Border BorderThickness="2, 2, 2, 2"
            Background="Orange"
            BorderBrush="{StaticResource    ControlElevationBorderBrush}">
        <StackPanel Orientation="Vertical">
            <ContentControl ContentTemplate="{StaticResource resNucleotide}"
                            Content="{x:Bind}"
                            HorizontalAlignment="Center"
                            Width="Auto"/>
            <TextBlock    Width="Auto" Text="Adenine"
                          HorizontalAlignment="Center"
                          Style="{StaticResource   CaptionTextBlockStyle}"
                          Margin="2"
            />
        </StackPanel>

    </Border>

</DataTemplate>The XAML is pretty much straightforward and there is not much to say about. Maybe with one exception: the <ContentControl>. I always think of the <ContentControl> as makro which “embeds” another control. That’s what happens here. The attribute ContentTemplate “embeds” our StaticResource resNucleotide. This way, we have one resource which will be used by each nucleotide, and they will all look the same.
We add the three remaining <DataTemplate>s for Cytosine, Guanine and Uracil. Check the code on GitHub if you want to have a deeper look at them.
And finally, we add a further <DataTemplate> for the defects in the RNA. That one is entirely different from the other templates:
<!--    ++++++++++++++++++++++++++++++++++++++++++++++++++++++++++++++++++++    -->
<!--    The Error nucleotide -->
<!--    ++++++++++++++++++++++++++++++++++++++++++++++++++++++++++++++++++++    -->
<DataTemplate x:Key="resNucleotide_Error" x:DataType="local:clWinUINucleotide">
    <Border BorderThickness="2, 2, 2, 2"
            Background="{StaticResource SystemFillColorCriticalBackgroundBrush}"
            BorderBrush="{StaticResource    SystemFillColorCriticalBrush}">
            <StackPanel Orientation="Vertical">
                <TextBlock  Width="Auto" Text="Error"
                            HorizontalAlignment="Center"
                            Margin="2"
                            Style="{StaticResource    BodyStrongTextBlockStyle}"
                />
            </StackPanel>
    </Border>
</DataTemplate>Of course, there is no <ContentControl> here, because there is no need to show a letter for a nucleotide.
Let’s talk about styling according to Windows guidelines: WinUI Gallery Dev
You have probably noticed the StaticResources like SystemFillColorCriticalBackgroundBrush, ControlElevationBorderBrush and many more. Theres are resources defined by Windows. You may find them in a file called Generic.XAML which is automatically included by the framework. But where do you know from, which resources to use. Here comes the WinUI3 Gallery Dev into play.
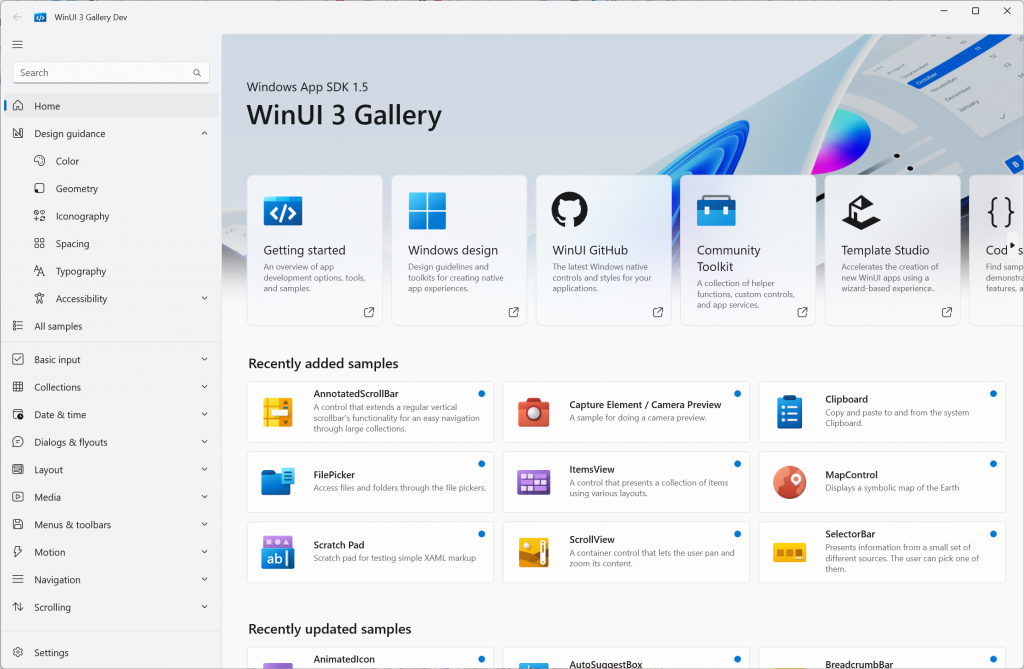
The WinUI Gallery is part of the Windows App SDK (you can even find the source code on GitHub) and it gives examples of the controls available in WinUI. The WinUI gallery also includes a “Design Guidance”. There you can find the colors, the typography, etc. which shall be used for the different purposes.
Connect the <ListView> with the <DataTemplate>
Now, we have a <DataTemplate> for each nucleotide and for a defect in place. How do we tell the <ListView> about the <DataTemplate>s? In Part I where we only had one <DataTemplate> and for that we used the ItemTemplate attribute of the <ListView>:
<!--    ++++++++++++++++++++++++++++++++++++++++++++++++++++++++++++++++++++    -->
<!--    Control to show the RNA (TAKEN FROM PART1) -->
<!--    ++++++++++++++++++++++++++++++++++++++++++++++++++++++++++++++++++++    -->
<ListView   x:Name="List_RNA"
            ItemsSource="{x:Bind  GetWinUIRNA_Page_Property.Get_obsvecRNA_Property, Mode=OneWay}"
            ItemTemplate="{StaticResource resNucleotide}"
            Width="100"
>
</ListView>Since we now have five different <DataTemplate>s to be chosen from, we need some additional magic, a “Selector” is required which tells the <ListView> which template to use:
<!--    ++++++++++++++++++++++++++++++++++++++++++++++++++++++++++++++++++++    -->
<!--    Control to show the RNA -->
<!--    ++++++++++++++++++++++++++++++++++++++++++++++++++++++++++++++++++++    -->
<ListView   x:Name="List_RNA"
        ItemsSource="{x:Bind
                   GetWinUIRNA_Page_Property.Get_obsvecRNA_Property, Mode=OneWay}"
        ItemTemplateSelector="{StaticResource
                              Key_WinUI_DataTemplateSelector_RNA_Nucleotids}"
        Width="100"

>
</ListView>
You can see the DataTemplate-Selector is implemented as a resource (you see it by the “StaticResource” statement) and it obviously can be found it under “Key_WinUI_DataTemplateSelector_RNA_Nucleotids”:
<!--    ++++++++++++++++++++++++++++++++++++++++++++++++++++++++++++++++++++    -->
<!--    Data template selector to be used to display the nucleotids -->
<!--    ++++++++++++++++++++++++++++++++++++++++++++++++++++++++++++++++++++    -->
<local:clWinUI_DataTemplateSelector_RNA_Nucleotids

        x:Key="Key_WinUI_DataTemplateSelector_RNA_Nucleotids"

        Adenine_Property="{StaticResource resNucleotide_Adenine}"
        Cytosine_Property="{StaticResource resNucleotide_Cytosine}"
        Guanine_Property="{StaticResource resNucleotide_Guanine}"
        Uracil_Property="{StaticResource resNucleotide_Uracil}"
        Error_Property="{StaticResource resNucleotide_Error}"
/>The name of the resource is defined in its x:key statement. Further on you will find the names of the five resources for the nucleotides which we created above: resNucleotide_Adenine, resNucleotide_Cytosine, resNucleotide_Guanine, resNucleotide_Uracil, resNucleotide_Error. Each of these templates is connected to a code behind function: Adenine_Property, Cytosine_Property, Guanine_Property, Uracil_Property, Error_Property.
The data template selector is implemented like a custom control. All the logic needed is wrapped up in a custom WinUI class, called clWinUI_DataTemplateSelector_RNA_Nucleotids.
How to implement our data template selector
namespace How2_PartII_DataTemplateSelector
{
        runtimeclass    clWinUI_DataTemplateSelector_RNA_Nucleotids : Microsoft.UI.Xaml.Controls.DataTemplateSelector
        {
            clWinUI_DataTemplateSelector_RNA_Nucleotids();

            Microsoft.UI.Xaml.DataTemplate    Adenine_Property;
            Microsoft.UI.Xaml.DataTemplate    Cytosine_Property;
            Microsoft.UI.Xaml.DataTemplate    Guanine_Property;
            Microsoft.UI.Xaml.DataTemplate    Uracil_Property;
            Microsoft.UI.Xaml.DataTemplate    Error_Property;

        }
}Obviously, there is not much to do. We need to define the code behind to gain access the data templates. Everything else is brought by the base interface Microsoft.UI.Xaml.Controls.DataTemplateSelector.
What is the purpose of these functions? The framework will call the setter version during the initialization of the control which uses the template selector. The setter gets an “interface” to the data template itself. The setter only needs to store it for later use (here the setter and the getter for Adenine):
//  ------------------------------------------------------------------------------
/*! \brief  getter/setter for adenine data template
*   \date   08/26/2025  AGS Start
*/
//  ------------------------------------------------------------------------------
winrt::Microsoft::UI::Xaml::DataTemplate clWinUI_DataTemplateSelector_RNA_Nucleotids::Adenine_Property()
{
    return  m_DataTemplate_Adenin_Property;
}
void clWinUI_DataTemplateSelector_RNA_Nucleotids::Adenine_Property(winrt::Microsoft::UI::Xaml::DataTemplate const& value)
{
    m_DataTemplate_Adenin_Property=value;

    return;
}These interfaces need to be stored somewhere. Therefore, we add a member for each item in the header file of the selector:
protected:
        Microsoft::UI::Xaml::DataTemplate m_DataTemplate_Adenin_Property;
        Microsoft::UI::Xaml::DataTemplate m_DataTemplate_Cytosine_Property;
        Microsoft::UI::Xaml::DataTemplate m_DataTemplate_Guanine_Property;
        Microsoft::UI::Xaml::DataTemplate m_DataTemplate_Uracil_Property;
Microsoft::UI::Xaml::DataTemplate m_DataTemplate_Error_Property;If you have look at the header file you will find a function that has been created by the framework: SelectTemplateCore(). The framework calls this function whenever an item in the <ListView> control (some for <GridView> control) is being rendered. The function gets an IInspectable interface of the item. In a first step we need to “cast” the IInspectable interface to a nucleotide:
        clWinUINucleotide   rWinUINucleotide;
        if ((item.try_as<clWinUINucleotide>(rWinUINucleotide))) {
Then we need to decide which <DataTemplate> is to be used. Our nucleotides have a “Type” property so we can easily implement a switch() statement. Depending on the type we return the appropriate interface to the <DataTemplate> which we stored above:
// ------------------------------------------------------------------------------
/*! \brief called by the framework: the the template according the item to be
inspected
* \date 08/26/2025 AGS Start
*/
// ------------------------------------------------------------------------------
winrt::Microsoft::UI::Xaml::DataTemplate clWinUI_DataTemplateSelector_RNA_Nucleotids::SelectTemplateCore(winrt::Windows::Foundation::IInspectable const& item)
{
winrt::Microsoft::UI::Xaml::DataTemplate rDataTemplate;
        clWinUINucleotide   rWinUINucleotide;
        if ((item.try_as<clWinUINucleotide>(rWinUINucleotide))) {
switch (rWinUINucleotide.enNucleotide_Type_Property()) {
case winrt::How2_PartII_DataTemplateSelector::enNucleotide_Type::Adenine: {
rDataTemplate = Adenine_Property();
break;
}
case winrt::How2_PartII_DataTemplateSelector::enNucleotide_Type::Cytosine: {
rDataTemplate = Cytosine_Property();
break;
}
case winrt::How2_PartII_DataTemplateSelector::enNucleotide_Type::Guanine: {
rDataTemplate = Guanine_Property();
break;
}
case winrt::How2_PartII_DataTemplateSelector::enNucleotide_Type::Uracil: {
rDataTemplate = Uracil_Property();
break;
}
default: {
rDataTemplate = Error_Property();
}
} // endswitch (rWinUINucleotide.enNucleotide_Type_Property()) {
}
else{
rDataTemplate = Error_Property();
} // endif (item.try_as<clWinUINucleotide>(rWinUINucleotide)) {e
return rDataTemplate;
}And that’s it (almost, see the final trick below).
The two versions of SelectTemplateCore()
If you look at the code, you will find two versions of SelectTemplateCore()which are just slightly different. One version has an additional parameter dp which is a DependencyObject.
So, where do we implement our switch() statement? Or to be precise, which version is called by the framework? Microsoft’s online documentation is not very clear about it. It turns out that in most of the cases, if you have a <ListView> control (<GridView> contro) from which you want to select a <DataTemplate> the version with one parameter is the right one. The version with two parameters is never being called.
If you have a <ContentControl> which uses a data template selector with the attribute ContentTemplateSelector=”…” instead, then the version with two parameters is being called. You can test this yourself if you make things a bit more complicated and use a <ContentControl> with a ContentTemplateSelector instead of using a DataTemplateSelector directly:
<!--    ++++++++++++++++++++++++++++++++++++++++++++++++++++++++++++++++++++    -->
<!--    Control to show the RNA / Deprecated version using ContentControl -->
<!--    ++++++++++++++++++++++++++++++++++++++++++++++++++++++++++++++++++++    -->
<ListView   x:Name="List_RNA"
            ItemsSource="{x:Bind
              GetWinUIRNA_Page_Property.Get_obsvecRNA_Property, Mode=OneWay}"
            Width="100"
>
  <ListView.ItemTemplate>
    <DataTemplate>
      <ContentControl  Content="{Binding}"
                       ContentTemplateSelector="{StaticResource
                          Key_WinUI_DataTemplateSelector_RNA_Nucleotids}"
      />
    </DataTemplate>
  </ListView.ItemTemplate>
</ListView>
The output of the RNA remains the same.
Don’t forget the final trick
If you compile the project you usually get an error like:
error C2039: 'clWinUI_DataTemplateSelector_RNA_Nucleotids': is not a member of 'winrt::How2_PartII_DataTemplateSelector::implementation'The code behind of the custom control which implements the data template selector needs to be aware of the implementation of the data template selector. Therefore, we add an include statement to the header of clWinUIControl_RNAList.h.
#pragma once

#include "clWinUIControl_RNAList.g.h"

#include    "clWinUIRNA.h"
#include    "clWinUI_DataTemplateSelector_RNA_Nucleotids.h"
Unfortunately, this is not very obvious. WinRT creates a lot of code by itself. As a matter of fact, we program only a small part of our WinUI classes. The rest is being added automatically by the framework. And it is obvious that the control needs know about the data template selector, unfortunately we can see it in “our” code. We only can see it by looking at the generated code.
Summary
Let’s summarize the major thoughts:
- While we have a 1:1 relationship between item and template if we use the ItemTemplate attribute, we create a 1:n relationship by using the attribute ItemTemplateSelector. That selector makes the connection between the <ListViewItem> and the <DataTemplate>s.
- A data template selector is defined as a separate XAML-resource by its key.
- The data template selector is implemented through the interface Microsoft.UI.Xaml.Controls.DataTemplateSelector. Each <DataTemplate> we want to use gets its own getter/setter.
- These setters are called by the framework during initialization of the <ListView>. Each setter gets an interface to the <DataTemplate>. The data template selector instance needs to store the interfaces.
- We need to override the SelectTemplateCore() function which is being called by the framework when an item is going to be rendered to select the appropriate <DataTemplate>.
- Don’t forget the #include statement in the header of the control (it’s being mentioned here because it might safe you hours of headache while searching for the problem…)
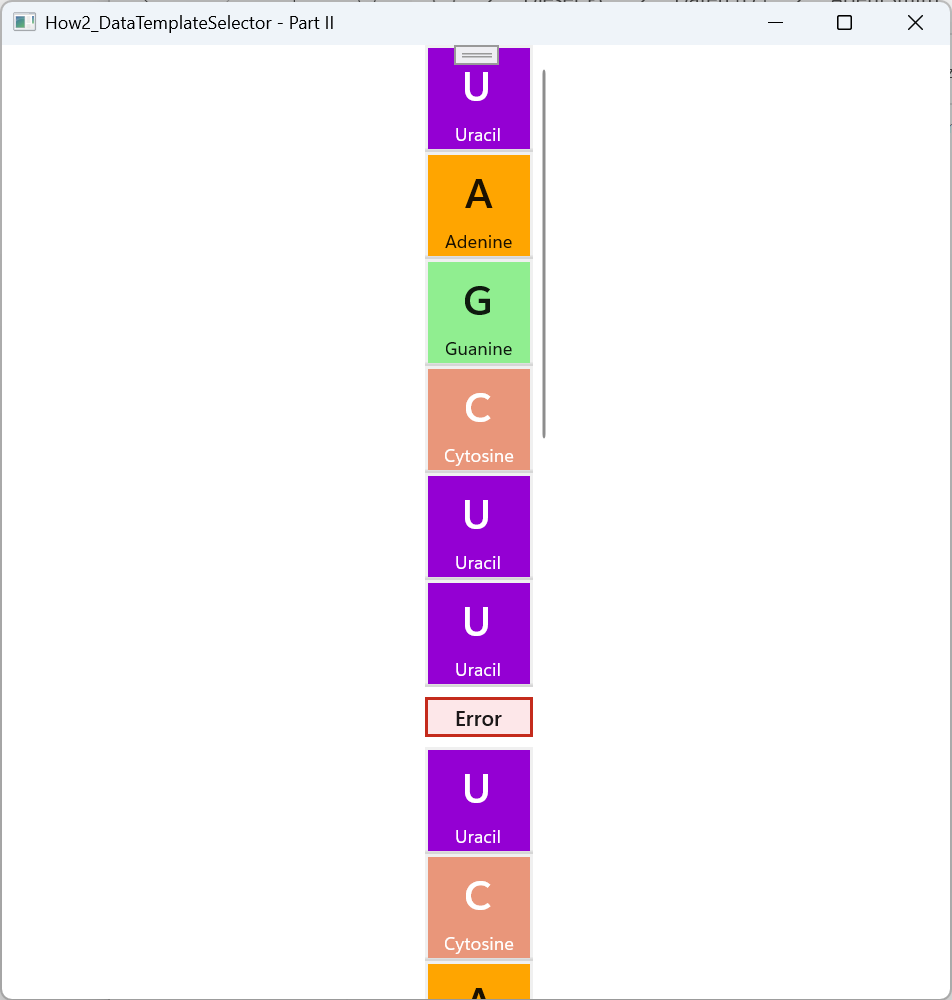
And that is our final result:
Where to go from here
We will extend our little RNA program a bit and add some functionality (the “feel” we talked in the introduction). Property change notifications are the mechanism to synchronize the UI and the internal data structures. In the end we will add some drag&drop functionality.