What is in for you?
In this tutorial I want to talk about Data Converters. This seems to be a less important topic, but once, you will need it, all of a sudden. And then you will either circumvent the problem, or you need to dig into that subject while you rather want to do something entirely different. So, this is what this tutorial is for.
I almost forgot to explain what a Data Converter is for: you usually need it in your XAML code if you want to get a property and the data type of the property is different than the one your code can provide. For example: you want to display a numerical value, let’s say a quantity. Then your code will provide the quantity as an integer, but XAML requires a string. The data converter will then be used to convert the integer to a string.
If you have read tutorial number four (How to program Property Change Notification ), you might have realized that we already had a similar problem, there. By then, we adjusted the property function accordingly and returned a string. In today’s tutorial we will make that right.
So, nothing new in the user experience, but leaner and finally better code. And from my experience, that is a lot to gain!
Oh wait, no extension to the user experience seems to be a bit stale. We will add some functionality to our “Clear” button: whenever the RNA does not contain any nucleotides we will switch off (means: hide) the entire control. And we will also do some formatting of the number of nucleotides being displayed.
At the end of this tutorial, our RNA gets a nicely styled headline and the control which displays the number of nucleotides gets a proper unit.

In this tutorial you will learn about:
- The implementation of a Data Converter
- The “Visible” attribute and how to use it within a Data Converter
- Header property of <ListView> (<GridView>, and many more).
- Styling of such ‘internal’ elements like “Header”
- How to use property change notifications.
- Boxing and unboxing data of different data types
You will find the code in my GitHub repositories: https://github.com/AgentSmith-Dev/How2-WinUI
What you should already know
It would help you a lot, if you already have read the How 2 number four, since we basically modify that code.
The User Experience
<ListView>’s Header property
My frequent readers know that I always start with the user experience. And there will be no deviation from this routine today.
Since we want to add the capability to hide the RNA, we need to have an element which can be hidden even if the RNA is already empty. Otherwise, we could not see any change if we hide and empty RNA.
Let us use the “Header” property of the <ListView> element. In WinUI3 XAML many controls (<ListView>, <GridView>, …) have a “Header” property with which you can display a text to be used as a headline or description. We will write a simple “RNA”:
<!--    ++++++++++++++++++++++++++++++++++++++++++++++++++++++++++++++++++++++++++++++++++++++++++++++++++++++    -->
<!--    List to show the RNA -->
<!--    ++++++++++++++++++++++++++++++++++++++++++++++++++++++++++++++++++++++++++++++++++++++++++++++++++++++    -->
<ListView   x:Name="List_RNA"
    ItemsSource="{x:Bind     GetWinUIRNA_Page_Property.Get_obsvecRNA_Property, Mode=OneWay}"
    ItemTemplateSelector="{StaticResource    Key_WinUI_DataTemplateSelector_RNA_Nucleotids}"
    Width="100"
    Header="RNA"
>Well, alhough it works as promised, it looks a bit boring. It would be nice if we could style it a bit. Of course, WinUI can do that. We just move the “Header” from an attribute of the <ListView> node to a child node:
<!-- ++++++++++++++++++++++++++++++++++++++++++++++++++++++++++++++++++++++++++++++++++++++++++++++++++++++ -->
<!-- List to show the RNA -->
<!-- ++++++++++++++++++++++++++++++++++++++++++++++++++++++++++++++++++++++++++++++++++++++++++++++++++++++ -->
<ListView x:Name="List_RNA"
ItemsSource="{x:Bind GetWinUIRNA_Page_Property.Get_obsvecRNA_Property, Mode=OneWay}"
ItemTemplateSelector="{StaticResource Key_WinUI_DataTemplateSelector_RNA_Nucleotids}"
Width="100"
>
<ListView.HeaderTemplate>
<DataTemplate>
<TextBlock Text="RNA" Style="{StaticResource TitleTextBlockStyle}"
HorizontalAlignment="Center"
/>
</DataTemplate>
</ListView.HeaderTemplate>
</ListView>I’d say, the code speaks for itself: we define the header in the <ListView.HeaderTemplate> node, then we wrap up everything we want to display in a <DataTemplate> node. Inside this node we have the XAML to display the header. In the example we have a simple <TextBlock> – but you could much more, if you you want to, you could even wrap up another <ListView>.
If you want to just style your headline, you can combine both approaches to make it more readable:
<!--    ++++++++++++++++++++++++++++++++++++++++++++++++++++++++++++++++++++++++++++++++++++++++++++++++++++++    -->
<!--    List to show the RNA -->
<!--    ++++++++++++++++++++++++++++++++++++++++++++++++++++++++++++++++++++++++++++++++++++++++++++++++++++++    -->
<ListView   x:Name="List_RNA"
    ItemsSource="{x:Bind     GetWinUIRNA_Page_Property.Get_obsvecRNA_Property, Mode=OneWay}"
    ItemTemplateSelector="{StaticResource    Key_WinUI_DataTemplateSelector_RNA_Nucleotids}"
    Width="100"
    Header="RNA"
>
<ListView.HeaderTemplate>
<DataTemplate>
<TextBlock Text="{Binding}" Style="{StaticResource TitleTextBlockStyle}"
HorizontalAlignment="Center"
/>
</DataTemplate>
</ListView.HeaderTemplate>
</ListView>In the last version, we kept the “Header” as an attribute of the <ListView> node. The <ListView.HeaderTemplate> node does the styling. Notice where the text comes from: in the <TextBlock> node we set the text attribute Text=“{Binding}”. This tells the XAML compiler to bind the content of the “Header” attribute to the content of the “Text” attribute.
Nice, isn’t it?!
But let’s stop with playing around with XAML – there is work to do.
The need for a Data Converter
But, when we clear the RNA, the text of the header will still be there. It would be much nicer if there wouldn’t be a header if there aren’t any nucleotides. We need a “Visibility” property for the entire <ListView> control:
<!--    ++++++++++++++++++++++++++++++++++++++++++++++++++++++++++++++++++++++++++++++++++++++++++++++++++++++    -->
<!--    List to show the RNA -->
<!--    ++++++++++++++++++++++++++++++++++++++++++++++++++++++++++++++++++++++++++++++++++++++++++++++++++++++    -->
<ListView   x:Name="List_RNA"
    ItemsSource="{x:Bind     GetWinUIRNA_Page_Property.Get_obsvecRNA_Property, Mode=OneWay}"
    ItemTemplateSelector="{StaticResource    Key_WinUI_DataTemplateSelector_RNA_Nucleotids}"
    Width="100"
    Header="RNA"
    Visibility="{x:Bind GetWinUIRNA_Page_Property.iGetRNANbNucleotides, Converter={StaticResource Converter_NoNucleotides}, Mode=OneWay}"
>
    <ListView.HeaderTemplate>
        <DataTemplate>
            <TextBlock  Text="{Binding}"  Style="{StaticResource  TitleTextBlockStyle}"
                        HorizontalAlignment="Center"
                        />
        </DataTemplate>
    </ListView.HeaderTemplate>
</ListView>If you try to compile that code, you get an error like: XamlCompiler error WMC1121: Invalid binding assignment: Cannot directly bind type ‚System.Int32‘ to ‚Microsoft.UI.Xaml.Visibility‘. Use a cast, converter or function binding to change the type.
The compiler tells us that it can not convert to return value of iGetRNANBNucleotides() which is an integer to a system type which is either winrt::Microsoft::UI::Xaml::Visibility::Visible or winrt::Microsoft::UI::Xaml::Visibility::Collapsed.
We need a Data Converter which does this conversion.
We start with the IDL:
namespace How2_DataConverter
{
[default_interface]
runtimeclass clWinUI_Converter_NoNucleotides : Microsoft.UI.Xaml.Data.IValueConverter
{
clWinUI_Converter_NoNucleotides();
}
}
That is fairly simply. We just need a converter class which is derived from the interface IValueConverter.
The MIDL compiler does a lot of work for us and already creates the prototypes for two required functions:
namespace winrt::How2_DataConverter::implementation
{
struct clWinUI_Converter_NoNucleotides : clWinUI_Converter_NoNucleotidesT<clWinUI_Converter_NoNucleotides>
{
clWinUI_Converter_NoNucleotides() = default;
winrt::Windows::Foundation::IInspectable Convert(winrt::Windows::Foundation::IInspectable const& value, winrt::Windows::UI::Xaml::Interop::TypeName const& targetType, winrt::Windows::Foundation::IInspectable const& parameter, hstring const& language);
winrt::Windows::Foundation::IInspectable ConvertBack(winrt::Windows::Foundation::IInspectable const& value, winrt::Windows::UI::Xaml::Interop::TypeName const& targetType, winrt::Windows::Foundation::IInspectable const& parameter, hstring const& language);
};
}The Convert() function is the function we need. We will get our integer in the parameter “value” and we will return a winrt::Microsoft::UI::Xaml::Visibility value. I’ll talk about the implementation in a minute. Before, we need to tell XAML to use our newly created converter.
First, we let XAML know about the converter function:
<Page.Resources>
<local:clWinUI_Converter_NoNucleotides x:Key="Converter_NoNucleotides"/>
Then we can use it:
<!--    ++++++++++++++++++++++++++++++++++++++++++++++++++++++++++++++++++++++++++++++++++++++++++++++++++++++    -->
<!--    List to show the RNA -->
<!--    ++++++++++++++++++++++++++++++++++++++++++++++++++++++++++++++++++++++++++++++++++++++++++++++++++++++    -->
<ListView   x:Name="List_RNA"
    ItemsSource="{x:Bind     GetWinUIRNA_Page_Property.Get_obsvecRNA_Property, Mode=OneWay}"
    ItemTemplateSelector="{StaticResource    Key_WinUI_DataTemplateSelector_RNA_Nucleotids}"
    Width="100"
    Header="RNA"
    Visibility="{x:Bind GetWinUIRNA_Page_Property.iGetRNANbNucleotides, Converter={StaticResource Converter_NoNucleotides}, Mode=OneWay}"
>
    <ListView.HeaderTemplate>
        <DataTemplate>
            <TextBlock  Text="{Binding}"  Style="{StaticResource  TitleTextBlockStyle}"
                        HorizontalAlignment="Center"
                        />
        </DataTemplate>
    </ListView.HeaderTemplate>
</ListView>Convert() – the converter function
Let’s have a look at the implementation of the Convert() function:
//  ------------------------------------------------------------------------------------------------------
/*! \brief  Converter function (to be used by XAML) to convert the number of nucleotides to a boolean
*   \date	10/16/2025	AGS Start
*   \param	value   (integer) value with the number of nucleotides
*   \return Collapsed   empty
*           Visible   non-empty
*/
//  ------------------------------------------------------------------------------------------------------
winrt::Windows::Foundation::IInspectable clWinUI_Converter_NoNucleotides::Convert(winrt::Windows::Foundation::IInspectable const& value, winrt::Windows::UI::Xaml::Interop::TypeName const& targetType, winrt::Windows::Foundation::IInspectable const& parameter, hstring const& language)
{
    language; parameter; targetType;

    winrt::Windows::Foundation::IInspectable    IRet;

    //  unbox the number of nucleotides
    int iNb = unbox_value<int>(value);

    //  box the visibility
    IRet = box_value(iNb != 0   ?   winrt::Microsoft::UI::Xaml::Visibility::Visible
                                :   winrt::Microsoft::UI::Xaml::Visibility::Collapsed);

    return  IRet;
}The function head Convert() is used by all the different converters. Therefore, it does neither know, what data type needs to be converted, nor does it know into what data type needs the conversion to be done. For these kind of problems, WinRT has the ability to wrap up a value in an IInspectable class. That happens in the Convert() function: we get the date to be converted in an IInspectable. And we also return the converted date in an IInspectable. To “unwrap” (WinRT calls it “unboxing a value”) we use the unbox_value<source_type> function. To “wrap” (WinRT calls it “boxing a value”) we use the box_vale<target_type> function.
If you’re not sure about the source type you get, you can also use a conversion with try_as<>:
//  Following is demo code which does nothing
//  if you're not sure about the source type, use the try_as<> version
int iNb_Demo;
if ((value.try_as<int>(iNb_Demo))) {
    //  ok
}
else {
    //  nok
}Some work to be done in the “machine room”
The code compiles without errors. But when you run it you will see that no proper updating happens when you paste a RNA sequence. The reason is that our <ListView> does not get informed about a change in the observable collection. You may find a detailed explanation and the code that needs to be added in the previous tutorial about Property Change Notification: How to program a Property Change notification (Part II) in user control to keep your UI in sync (C++).
Here, I will just summarize the additional code:
First, our RNA-List control needs be able to handle property change notifications. We add Microsoft.UI.Xaml.Data.INotifyPropertyChanged as a base class in the IDL:
namespace How2_DataConverter
{
    [default_interface]
    runtimeclass clWinUIControl_RNAInfo : Microsoft.UI.Xaml.Controls.UserControl,   Microsoft.UI.Xaml.Data.INotifyPropertyChanged
    {
        clWinUIControl_RNAInfo();

        clWinUIRNA  GetWinUIRNA_Property;

    }
}In the header we add an event which will be raised upon a change and we add the PropertyChanged() functions as well. We also add an event for changes of the observable vector:
namespace winrt::How2_DataConverter::implementation
{
    struct clWinUIControl_RNAInfo : clWinUIControl_RNAInfoT<clWinUIControl_RNAInfo>
    {
        clWinUIControl_RNAInfo()
        {
            // Xaml objects should not call InitializeComponent during construction.
            // See https://github.com/microsoft/cppwinrt/tree/master/nuget#initializecomponent
        }

        winrt::How2_DataConverter::clWinUIRNA GetWinUIRNA_Property();
        void GetWinUIRNA_Property(winrt::How2_DataConverter::clWinUIRNA const& value);

        winrt::event_token  PropertyChanged(winrt::Microsoft::UI::Xaml::Data::PropertyChangedEventHandler const& handler);
                    void    PropertyChanged(winrt::event_token const& token) noexcept;


    protected:
                    void    OnVectorChanged_Event_RNA(winrt::Windows::Foundation::IInspectable const& sender, winrt::Windows::Foundation::Collections::IVectorChangedEventArgs const& rArgs);


        winrt::event<Microsoft::UI::Xaml::Data::PropertyChangedEventHandler>  m_WinUIControl_RNAInfo_PropertyChanged;
        winrt::event_token  m_Event_RNAChanged; //!<    event token for changes in the RNA vector

        winrt::How2_DataConverter::clWinUIRNA  m_WinUIRNA = nullptr;

    };
}We extend our GetWinUIRNA_Page_Property() function so we will be informed about changes in the vector:
void clWinUIControl_RNAList::GetWinUIRNA_Page_Property(winrt::How2_DataConverter::clWinUIRNA const& value)
{
    if (this->m_WinUIRNA == value) {
        //  no change -> skip
    }
    else {
        this->m_WinUIRNA = value;

        //  check we already have an event token. If so, remove it first
        //  ''''''''''''''''''''''''''''''''''''''''''''''''''''''''''''''''
        if (!m_Event_RNAChanged) {
            //  no token (yet) -> nothing to remove -> done
        }
        else {
            //  remove event
            m_WinUIRNA.Get_obsvecRNA_Property().VectorChanged(m_Event_RNAChanged);
        }   //  endif (m_Event_RNAChanged == 0) {

        //  attach event handler to the RNA vector
        m_Event_RNAChanged = m_WinUIRNA.Get_obsvecRNA_Property().VectorChanged({ this, &clWinUIControl_RNAList::OnVectorChanged_Event_RNA });

    }   //  endif (this->m_WinUIRNA == value) {
}And we add a function which forces an update when a change in the vector occurs:
void    clWinUIControl_RNAList::OnVectorChanged_Event_RNA(winrt::Windows::Foundation::IInspectable const& sender, winrt::Windows::Foundation::Collections::IVectorChangedEventArgs const& rArgs)
{
    sender;

    switch (rArgs.CollectionChange()) {
    case    winrt::Windows::Foundation::Collections::CollectionChange::Reset: {
        //  all nucleotides have been removed from the RNA
        m_WinUIRNA_PropertyChanged(*this, Microsoft::UI::Xaml::Data::PropertyChangedEventArgs{ L"GetWinUIRNA_Page_Property" });
        break;
    }
    case    winrt::Windows::Foundation::Collections::CollectionChange::ItemInserted: {
        //  a nucleotide has been inserted into the RNA
        m_WinUIRNA_PropertyChanged(*this, Microsoft::UI::Xaml::Data::PropertyChangedEventArgs{ L"GetWinUIRNA_Page_Property" });
        break;
    }
    case    winrt::Windows::Foundation::Collections::CollectionChange::ItemRemoved: {
        //  a nucleotide has been removed from the RNA
        m_WinUIRNA_PropertyChanged(*this, Microsoft::UI::Xaml::Data::PropertyChangedEventArgs{ L"GetWinUIRNA_Property" });
        break;
    }
    case    winrt::Windows::Foundation::Collections::CollectionChange::ItemChanged: {
        assert(false);
        break;
    }
    }   //  endswitch (rArgs.CollectionChange()) {

    return;
}A second Data Converter with a bit more logic
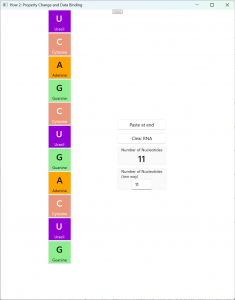
In our tutorial number four we added the display of the number of nucleotides to the main window:
<Grid   Margin="0, 10, 0, 0"    Width="150"
        BorderBrush="{StaticResource  CardStrokeColorDefaultBrush}"
        Background="{StaticResource CardBackgroundFillColorSecondaryBrush}"
        BorderThickness="1"
        CornerRadius="{StaticResource   ControlCornerRadius}"
        HorizontalAlignment="Left">
    <Grid.RowDefinitions>
        <RowDefinition Height="Auto"/>
        <RowDefinition Height="Auto"/>
    </Grid.RowDefinitions>
    <TextBlock    Grid.Row="0"
                  Text="Number of Nucleotides"
                  Style="{StaticResource  CaptionTextBlockStyle}"
                  HorizontalAlignment="Center"
                  />
    <TextBlock    Grid.Row="1"
                  Text="{x:Bind   hstrGetRNANbNucleotides, Mode=OneWay}"
                  Style="{StaticResource  TitleTextBlockStyle}"
                  HorizontalAlignment="Center"
                  />
</Grid>We got the number of the nucleotides by the code behind function hstrGetRNANbNucleotides():
//  ------------------------------------------------------------------------------------------------------
/*! \brief  property (to be used by XAML): number of nucleotides in the RNA object
*
*           Used for one-way binding
*   \date   09/24/2025  AGS Start
*/
//  ------------------------------------------------------------------------------------------------------
hstring MainWindow::hstrGetRNANbNucleotides()
{
		return  to_hstring(this->m_WinUIRNA.Get_obsvecRNA_Property().Size());
}XAML can only use this function because it returns a string. But internally we deal with an integer. Therefore, we had to converted the integer to a string by using to_hstring(). And this was only necessary to satisfy XAML needs. Not a good approach!
Now, we want to return the integer directly and let do XAML the conversion itself. Let’s change our property function:
//  ------------------------------------------------------------------------------------------------------
/*! \brief  property (to be used by XAML): number of nucleotides in the RNA object
*
*           Used for one-way binding
*   \date   09/29/2025  AGS Start
*/
//  ------------------------------------------------------------------------------------------------------
int32_t clWinUIRNA::iGetRNANbNucleotides()
{
    return  Get_obsvecRNA_Property().Size();
}<Grid Margin="0, 10, 0, 0" Width="150"
BorderBrush="{StaticResource CardStrokeColorDefaultBrush}"
Background="{StaticResource CardBackgroundFillColorSecondaryBrush}"
BorderThickness="1"
CornerRadius="{StaticResource ControlCornerRadius}"
HorizontalAlignment="Left">
<Grid.RowDefinitions>
<RowDefinition Height="Auto"/>
<RowDefinition Height="Auto"/>
</Grid.RowDefinitions>
<TextBlock Grid.Row="0"
Text="Number of Nucleotides"
Style="{StaticResource CaptionTextBlockStyle}"
HorizontalAlignment="Center"
/>
<TextBlock Grid.Row="1"
Text="{x:Bind GetWinUIRNA_Property.iGetRNANbNucleotides, Mode=OneWay}"
Style="{StaticResource TitleTextBlockStyle}"
HorizontalAlignment="Center"
/>
</Grid>If you try to compile it by now, you will realize that it compiles fine. So, what about the Data Converter?
WinUI does automatic type conversion for simple types, like int to string. That is what we see in the example. But what about formatting? Let’s assume we have a rather large RNA (which is not uncommon in the real life of a biochemistry laboratory)? An RNA with more than one thousand nucleotides? Then, we would like to have our ‘thousands’ separator. And also a unit would be fine: we will add a “peaces” unit: “pcs”.
Finally: the Data Converter
We start again with the IDL:
namespace How2_DataConverter
{
	[default_interface]
	runtimeclass clWinUI_Converter_NbNucleotides : Microsoft.UI.Xaml.Data.IValueConverter
	{
		clWinUI_Converter_NbNucleotides();
	}
}The MIDL creates the prototypes for the Convert() functions:
namespace winrt::How2_DataConverter::implementation
{
    struct clWinUI_Converter_NbNucleotides : clWinUI_Converter_NbNucleotidesT<clWinUI_Converter_NbNucleotides>
    {
        clWinUI_Converter_NbNucleotides() = default;

        winrt::Windows::Foundation::IInspectable Convert(winrt::Windows::Foundation::IInspectable const& value, winrt::Windows::UI::Xaml::Interop::TypeName const& targetType, winrt::Windows::Foundation::IInspectable const& parameter, hstring const& language);
        winrt::Windows::Foundation::IInspectable ConvertBack(winrt::Windows::Foundation::IInspectable const& value, winrt::Windows::UI::Xaml::Interop::TypeName const& targetType, winrt::Windows::Foundation::IInspectable const& parameter, hstring const& language);
    };
}Add the converter function to the XAML and use it:
<UserControl
    x:Class="How2_DataConverter.clWinUIControl_RNAInfo"
    xmlns="http://schemas.microsoft.com/winfx/2006/xaml/presentation"
    xmlns:x="http://schemas.microsoft.com/winfx/2006/xaml"
    xmlns:local="using:How2_DataConverter"
    xmlns:d="http://schemas.microsoft.com/expression/blend/2008"
    xmlns:mc="http://schemas.openxmlformats.org/markup-compatibility/2006"
    mc:Ignorable="d">


    <UserControl.Resources>
        <local:clWinUI_Converter_NbNucleotides x:Key="Converter_NbNucleotides"/>
    </UserControl.Resources>

    <Grid   Margin="0, 10, 0, 0"    Width="150"
                    BorderBrush="{StaticResource  CardStrokeColorDefaultBrush}"
                    Background="{StaticResource CardBackgroundFillColorSecondaryBrush}"
                    BorderThickness="1"
                    CornerRadius="{StaticResource   ControlCornerRadius}"
                    HorizontalAlignment="Left">
        <Grid.RowDefinitions>
            <RowDefinition Height="Auto"/>
            <RowDefinition Height="Auto"/>
        </Grid.RowDefinitions>
        <TextBlock    Grid.Row="0"
                              Text="Number of Nucleotides"
                              Style="{StaticResource  CaptionTextBlockStyle}"
                              HorizontalAlignment="Center"
                              />
        <TextBlock    Grid.Row="1"
                              Text="{x:Bind   GetWinUIRNA_Property.iGetRNANbNucleotides, Converter={StaticResource Converter_NbNucleotides}, Mode=OneWay}"
                              Style="{StaticResource  TitleTextBlockStyle}"
                              HorizontalAlignment="Center"
                              />
    </Grid>

</UserControl>Convert() – the converter function
Let’s have a quick look at the implementation of the Convert() function:
//  ------------------------------------------------------------------------------------------------------
	/*! \brief  Converter function (to be used by XAML) to convert the number of nucleotides to a string
*   \date	09/29/2025	AGS Start
	*   \param	value   (integer) value with the number of nucleotides
*/
//  ------------------------------------------------------------------------------------------------------
winrt::Windows::Foundation::IInspectable clWinUI_Converter_NbNucleotides::Convert(winrt::Windows::Foundation::IInspectable const& value, winrt::Windows::UI::Xaml::Interop::TypeName const& targetType, winrt::Windows::Foundation::IInspectable const& parameter, hstring const& language)
{
    language; parameter; targetType;

    winrt::Windows::Foundation::IInspectable    IRet;

		int iNb = unbox_value<int>(value);

    std::string str;
    std::string strRd;
    winrt::hstring  hstr;

    //  format the number in iNb to #.###.###
    //  ''''''''''''''''''''''''''''''''''''''''''''''''''''''''
    while(1){
			...
    } //  endwhile (1) {

    str += " pcs";

    hstr = to_hstring(str);

    IRet = box_value(hstr);

    return  IRet;
}
The while loop does some string formatting. The interesting part is at the end. Like we did in the previous Convert() function, we use the box_value() function to return a string.
Summary
Let’s summarize the major thoughts:
- A Data Converter is being used if XAML requires a different data type than a property can provide.
- Each Data Converter is of type Microsoft.UI.Xaml.Data.IValueConverter and has two Convert() functions.
- The Convert() function gets the value which needs to be converted as a parameter of type IInspectable. The value can be accessed by unbox_value<source type>().
- The Convert() function returns the converted value again as an IInspectable. To store the value in the IInspectable the box_value<target type>() can be used.
- The Data Converter needs to be declared in the <XYZ.Resources> section of the XAML.
- The Data Converter can be accessed in a XAML control by using the Converter=”…” property.
- Property Change Notification mechanisms need to be in place